Build Jekyll with Docker for Azure Static Website
There are several articles explaining how to use Jekyll for creating static websites, how to build them using an existing Docker image, how to host in Azure, and the new static website feature in Azure. I just didn’t find all the resources to combine them in one place. This post describes what I learned in putting all the pieces together, and describes some of the issues I encountered. If you don’t want to read my life story and my rationale behind choosing these technologies, skip right down to the good parts.
A bit of background
For quite a while I’ve been interested in getting a website up and running. 20 years ago while in high school I began making a few hobby websites using a WYSIWYG website designer and host. This kicked off my foray into computer programming as I began to experiment with JavaScript snippets after becoming frustrated with the limitations of the designer. My first compiled applications were interactive graphics experiments and games as Java applets. Today I work on web applications, mostly the back-end, in my career.
Yet, for my whole adult life, I’ve had no place of my own on the web! The really embarrassing part is that I’ve been paying GoDaddy for .NET website hosting for the last 8 years and never managed to get around to putting up a site.
Maintaining a website can be quite a bit of work. I’d rather spend creative energies on things less mundane than html. Many popular CMS’s are supposed to make things easier, but introduce the need for maintaining databases, keeping up with security patches, and paying for enough hosting muscle to run a bloated framework for dynamically serving up mostly static content.
Jekyll
Jekyll builds a static html website or blog out of markdown. Perfect! I’ve been writing a lot of markdown lately given that most Git hosting services can render readme’s on the web. In fact, Jekyll powers GitHub Pages. GitHub Pages is a great hosting option for many sites, so long as you are OK with their limitations.
You can do a lot more with a Jekyll site than you could with just a collection of markdown files. By following a particular directory structure and providing a few configuration values, Jekyll can do quite a bit, but the real magic comes when you sprinkle your .html and .md files with the Liquid templating language that allows you to access metadata, pull in shared code, iterate over collections of content, format data, and more.
The main downside I have encountered so far with using Jekyll is that I cannot stop my mind from seeking parallels between the relationship of Dr. Jekyll and Mr. Hyde to that of markdown and html. That reminds me, I need to add Mary Shelley’s “Frankenstein” and David Flanagan’s “JavaScript: The Definitive Guide” to my reading list.
Azure Static Website
I’m wanting to get more familiar with Azure, as we have begun working on hosting applications there for my day job. Microsoft recently announced that you can host static websites from blob storage. https://azure.microsoft.com/en-us/blog/static-websites-on-azure-storage-now-generally-available/
This seemed like a great option. I don’t need to run any kind of framework in the back end to serve static files, yet all the capabilities of Azure are there ready for me to use if I ever need them.
The tradeoff for requiring no processing at retrieval time with Jekyll is that you have spend a bit of time building it after writing your markdown based pages. Fortunately, Azure DevOps pipelines also gives me a way to do this build while practicing CI/CD with my own site. You get 1 devops project and pipeline for free with pretty reasonable amount of build time per month, so this won’t cost me anything extra. Azure DevOps makes it easy to trigger a build whenever I push changes to my private repo on GitHub for hosting the website source code. Another recent welcome announcement from Microsoft was that private repositories are now free. https://github.blog/2019-01-07-new-year-new-github/
Docker
Speaking of building the site, I need to be able to do so locally to preview before I decide to push my changes to GitHub and affect the live site. Jekyll is built on a ruby ecosystem which is most at home in Linux. I’m most at home in Windows. You can get this running on Windows, but by some accounts this isn’t pleasant. Most instructions involve package managers i’m not familiar with, languages I’m not familiar with, and gasp Bash commands. I’m using a lot of various technologies on this project, but to get anything done you have to draw the line somewhere. Enter Docker. Using a linux docker image that is already available, you can build your site on Windows 10 without having to install a whole new tool chain. Of course, you do have to install Docker :)
Putting it all together
There are a lot of great resources already out there that helped me along the way. I don’t want to repeat all of the information out there. At the risk of bouncing you around a lot, I’ve decided to collected them here with only some commentary along the way on which parts were most helpful and where I had to deviate or ran into unexpected difficulties.
Azure Static web site hosting meets Jekyll by Vidar Kongsli
While the info on creating a storage account via Azure CLI may be useful, I opted for doing so directly in the Azure Portal. His instructions are still applicable as of the writing of this article though the static website feature is now out of preview.
He also turned me on to the idea of using a Docker image for building, but he proceeds to explain getting your build going with ruby gems. Skip over that bit if you want to use Docker like I did.
He also has Jekyll scaffold the project while I opted to build all the files up by hand using the tutorial on Jekyll’s website so that I would feel more comfortable understanding the site’s foundation.
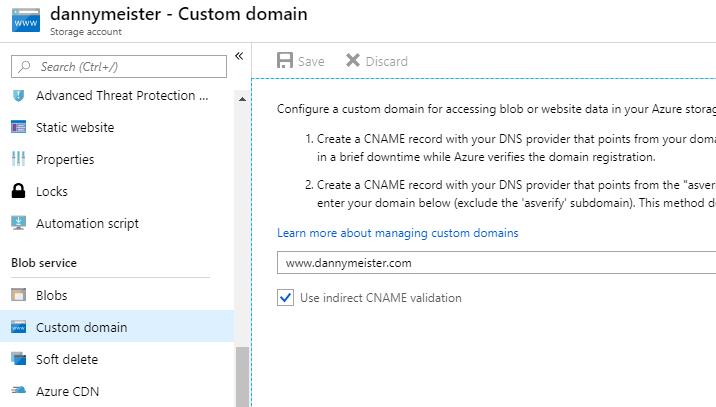
The info on using Azure CDN and custom domains is a great idea. I however opted for Cloudflare instead. We’ll get to that later.
Running Jekyll on Windows using Docker by Fabian Wetzel
This article got me going on Windows without too many difficulties. I didn’t bother with the caching stuff.
The first hurdle was that when Docker attempted to mount a volume to my local file path, Windows needed to prompt me for permissions to allow it. However, the notifications system in Windows was apparently running way behind. After fighting with it and Googling for a while, suddenly Windows began popping up the dozens of prompts to allow Docker the file access it needed. Now my build worked.
Here’s a few more helpful tidbits on the Docker and Jekyll command lines that I found elsewhere:
--watchwill automatically rebuild the site when files change, but--force_pollingis required for it to work properly on Windows--livereloadallows your site to automatically reload in the browser as Jekyll watches your source files and rebuilds any changes.- The above setting also requires you to map a second port with
-p 35729:35729. --draftsallows you to preview unfinished posts on your computer that are not yet dated. Leave this off when building your site for publishing.
All together, the PowerShell command I’m running to build and serve my site locally with live updates of my blog post I’m drafting ended up looking like this:
docker run --rm -v ${PWD}:/srv/jekyll -it -p 4000:4000 -p 35729:35729 jekyll/builder jekyll serve --watch --force_polling --livereload --drafts
Jekyll Step by Step Tutorial
The tutorial on the official site is good. It teaches you the fundamentals of how Jekyll sites work, and gets you to a workable blog website quickly.
Jekyll with VSTS and Azure by Edward Thomson
This post was helpful in several ways on furthering me towards getting my Azure DevOps pipeline set up, but was dated in several ways. First and least important, Visual Studio Team Services (VSTS) has been re-branded Azure DevOps (and may be called something different by the time you are reading this). It’s nice to know both names when trying to hunt down information. Second, the Docker yaml task has changed. Third, his article predates the static websites feature, so he publishes to an Azure App Service.
Here is where my efforts really got bogged down for quite some time.
The documentation on yaml pipeline tasks is generally pretty poor. I finally resorted to setting them up without using the new Infrastructure as Code-aligned yaml pipeline, then exported the steps as yaml after I got them working.
The current Docker task is not able to run this Docker container in Windows. I am not sure if Linux containers just don’t work at all on the Windows agent (despite them working fine on Windows 10), or if this is just a bug with the volumes parameter on this task, but it would fail with an “invalid volume specification” error. I fought with it long enough that I switched to an Ubuntu build agent. Track on GitHub
The user running the jekyll build process on the container won’t have permission to write to the mounted volume from the build agent. I had to run a chmod command as part of the container command to fix this. Oh no, I started out all of this wanting to avoid any bash shell scripting! We’ve come full circle!
Troubleshooting issues on the container is tricky. If you wan to see what is going on in a container and are frustrated that standard output doesn’t make it into the pipeline build log, make sure to un-check “Run in Background” option on the container.
AzureFileCopy task is only compatible with Windows which I discovered after switching to an Ubuntu build agent… even though the underlying AzCopy tool is cross platform. Apparently because of the PowerShell involved… even though PowerShell is now cross platform. :/ Track on GitHub. I ended up switching to running the Azure CLI commands from bash.
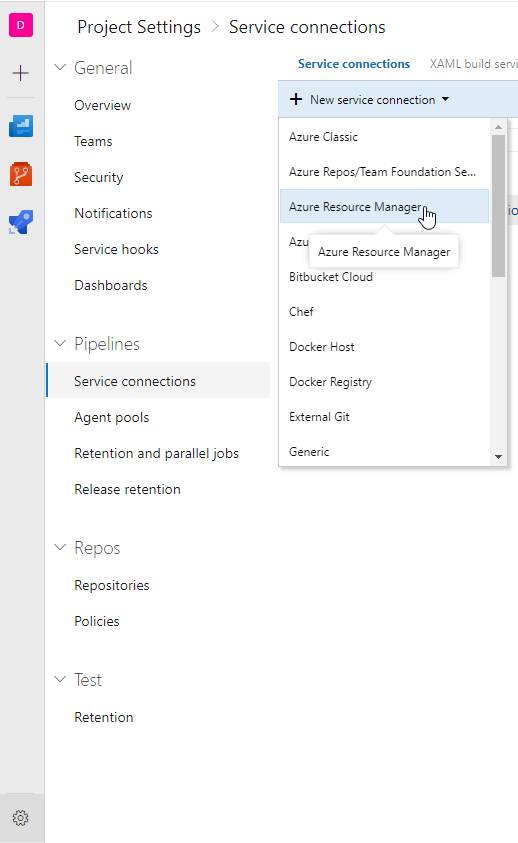
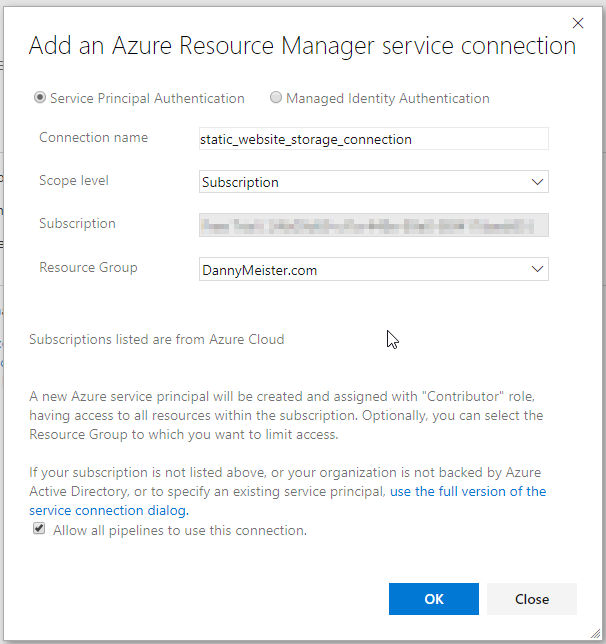
You have to establish permission to upload to blob storage. I ended up doing this by creating a service connection, then choosing that for the Azure CLI task. I also had to grant contributor rights for the Azure DevOps account. https://docs.microsoft.com/en-us/azure/devops/pipelines/library/service-endpoints?view=azure-devops
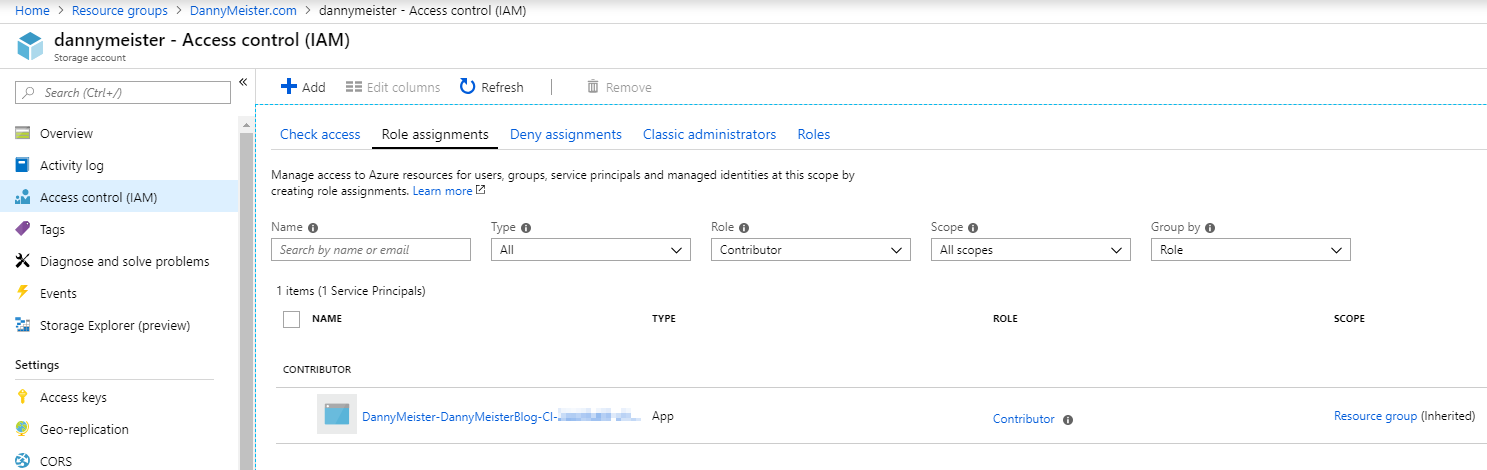
Also, back in the portal on the access controls for your storage account, you should see that your pipeline now has Contributor role assigned.
Here’s my resulting yaml file:
steps:
- task: Docker@1
  displayName: 'Jekyll build'
  inputs:
    containerregistrytype: 'Container Registry'
    command: 'Run an image'
    imageName: 'jekyll/builder:latest'
    volumes: '$(Build.SourcesDirectory):/srv/jekyll'
    containerCommand: '/bin/bash -c "chmod a+wx /srv/jekyll && jekyll build --future"'
    runInBackground: false

- task: AzureCLI@1
  displayName: 'Azure CLI'
  inputs:
    azureSubscription: 'static_website_storage_connection'
    scriptLocation: inlineScript
    inlineScript: |
     az storage blob upload-batch  --account-name dannymeister -d '$web' -s "${BUILD_SOURCESDIRECTORY}/_site"
    addSpnToEnvironment: true
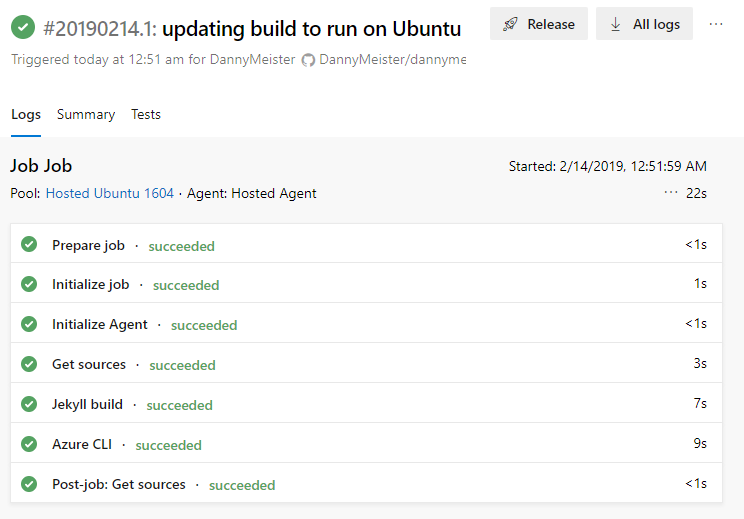
Woohoo, finally a successful build!
HTTPS and CDN with Cloudflare
At this point, my site is available at https://dannymeister.z19.web.core.windows.net/. Not very pretty. I mentioned earlier that you could set up custom domain names, global caching, and HTTPS via Azure CDN. I was afraid this would get me into more expensive features on Azure (note: I didn’t spend much time researching this cost). I’ve heard many great things about the performance and security features of Cloudflare, so I decided to go that route.
How to get your SSL for free on a Shared Azure website with CloudFlare
This post by Troy Hunt got me most of the way towards getting my domain pointing at my static website in Azure with an auto-renewing SSL cert. Here’s a few things that I had to deal with:
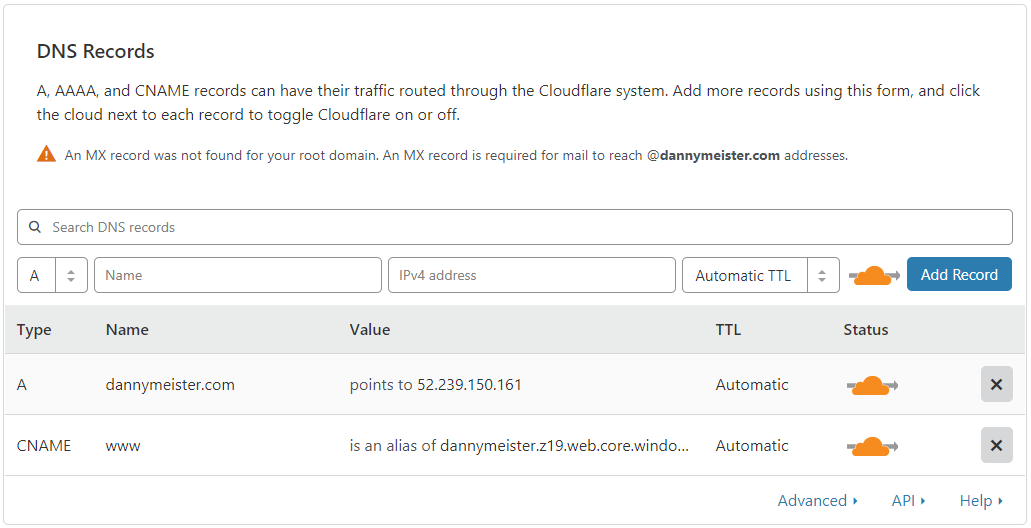
- Obviously, the instructions for turning your DNS servicing over to Cloudflare will differ based on who you buy your domain name from. Mine was from GoDaddy, and after poking around for a while, I was able to find where to do it in their management portal.
- You MUST choose “Full” for the SSL mode in Cloudflare or it won’t be able to connect to Azure Blob Storage which requires HTTPS.
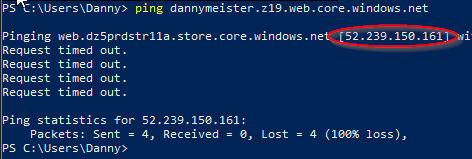
- For the static website in Azure, I had to discover the actual IP address for the A record. It was not on the custom domain page in Azure for me as shown for Troy when he added a custom domain to an Azure Webapp. Running
ping dannymeister.z19.web.core.windows.netshowed me that it was redirected to another url and gave me my IP.
 Second “Woohoo” of the blog post!
Conclusion
This stack is working out well for me, though it is very early days. Markdown is a breeze, I have continuous deployment set up, my site is secure and speedy, I have plenty of room to expand to Azure services in the future, and (so far) I’m not paying for anything but my domain name.
Thank you for reading my first blog post! Whether you are here to pique your curiosity in something new, or you’ve made it here searching for something that is causing you troubles, I hope this was in some way helpful. I’ll work to improve the looks and functionality of the site, as well as start filling it with content. One of those may be some sort of comment system. For the time being you can contact me with comments on Twitter @DannyMeister259